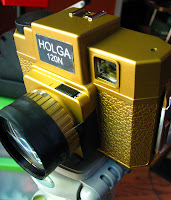
 I set out to do some macro work with the Holga yesterday and was really pleased with the results. All images were taken with the bulb setting, on Kodak Ektar 120 film and developed with Arista C-41 chemicals. While this particular post focuses on how to do this really easy macro modification and to determine the point of focus for the modified lens, I'm (perhaps deliberately?) not offering much concrete advice on determining the specific length of exposure one needs to use in order to achieve good results. I consider myself to have gotten lucky when it came to exposure times, since this was all guess work on my part. What worked for me--what worked for the conditions I was working with/in--was an exposure time of approximately 3-5 seconds. The images were a bit over-exposed, but they scanned well, and I didn't need to do much adjusting of levels. Note: I took all the images inside, in front of a sliding glass door on a sunny day. For some shots, I got a little extra help from a diffused external light (an old Movie Light, model G100), but I didn't find this made a huge difference in terms of exposure times.
For those unfamiliar with the kind of images an unmodified Holga is capable of making, I offer the following visual comparison below. The image left was taken with the Holga's regular (plastic) lens, the image right is an image made with the x10 filter attached.

As for the details of the macro mod:
Step 1: Affix (with electrical tape) a macro lens to the front of the Holga lens (see images above and below). I find that 52mm filters work really well, size-wise. In this case, I used the x10 magnifying filter, but I've also worked with the x4 filter. Note: It's helpful to use plenty of tape here, especially when using the thicker lenses and/or when shooting outdoors. I did all these shots on the tripod, so I knew the lens was pretty secure, as is.
Step 2: Determine point of focus for the modified lens. To do this, I taped a piece of wax paper to the inside of the Holga (see image below). With the camera set on bulb, I opened the shutter, while focusing on something I'd be able to see through the wax paper. It's helpful to choose something with definition, and something well-lit. In this case, I focused on the knob of my Letertron system. Note: You can produce really compelling images using wax paper or vellum as an alt film plane.
After much hard math and difficult calculations, I determined that the point of focus was approximately the distance of a leopard butter knife (aka 6 inches). Note: I measured the distance from the body of the camera to the object (or part of object) I wanted in focus and not from the lens barrel itself (see image below).
 This image (right) resulted from the set-up depicted above.
And this lastly: I offer this (perhaps too-obvious) word of caution when it comes to framing compositions with the close-up lens attached. Working with a six-inch lens to object distance means that Holga's viewfinder will not be accurate--far from it. With these images I had to wing things when it came to framing the composition--I just aimed the taking lens at what I wanted to get in the frame and hoped for the best. Final tip: If (or I should say when) I do this again, I'll definitely think more carefully about the kind and quality of arrangements I choose to photograph with the x10 filter. The depth of field here is, not surprisingly, extremely shallow--I didn't give this enough thought while I creating my mixed/media object compositions. Given the (relatively thoughtless) way I staggered some of the objects in the composition, some of those objects were really fuzzy/distorted and got in the way, so to speak, of my ability to make a decent image. In the case of the image above, I wanted the farm girl figure and gramophone in the shot, but they ended up being so fuzzy and blown out, they really compromise the overall quality of the image. In hindsight, I wish I'd have left them out or positioned them closer to the lens. The object relations in the image below, by contrast, make for a much more compelling image. The horse head, clock, tv, and running man are all, more or less, in focus. The figure in the maroon dress, while out of focus, is large enough and of a strong enough color that it doesn't necessarily take away from the overall quality of the image.


